
Pipedrive Integration
Learn how to set up OneClick Tracking.
OneClick Tracking is a new feature for Meta Ads advertisers who use Pipedrive as their CRM. It provides accurate tracking of qualified leads.
This solution corrects wrong attributions made by Meta, delivering real data based on UTMs and enabling safer scaling decisions.
With OneClick Tracking you see the volume of real conversions per period right in your Ads Manager, making for a quick, clear audit without dashboards that are a hassle to keep up to date.
Note: OneClick Tracking removes the need for extra tracking tools!
Setting up Pipedrive to receive UTMs
Section titled “Setting up Pipedrive to receive UTMs”Before setting up OneClick Tracking, you need to prepare Pipedrive to receive UTMs. Follow the steps below:
-
Make sure you have “Admin” access to your Pipedrive account.
-
Creating custom fields in Pipedrive:
-
In Pipedrive, click your name/icon in the top-right corner.
-
Go to Company settings (“Configurações da empresa”).
-
Open the fields area
-
Go to Data fields (“Campos de dados”).
-
Create a Field Group (for organization)
-
Under Field group, create a new group called Marketing.
-
Save.
-
Create the custom fields (Text type) inside the “Marketing” group
For each field to create:
- Click Add custom field
- Set the field name
- Select the Text type
- Choose the Marketing group
- Save
Fields to create:
- utm_source (Text → Marketing)
- utm_medium (Text → Marketing)
- utm_campaign (Text → Marketing)
- utm_content (Text → Marketing)
- utm_term (Text → Marketing)
Done! You now have custom fields that record the UTMs inside the Deals created in Pipedrive.
- Making sure the UTMs are filled in inside each Deal:
-
Using Pipedrive’s native form: just create the form and install it on your site, following the tutorial.
-
Tap here to open the tutorial.
-
Using a WordPress/Elementor form: follow this tutorial step by step to create hidden fields in your site’s form.
-
First, tap here to open the tutorial on creating hidden fields.
-
Then you need to send the form data to Pipedrive using the direct Pipedrive integration (go to Marketplace > Search for “elementor”).

- Using other data sources (Meta’s native form, etc.): follow this tutorial to use integration tools such as Make or N8N.
- Tap here to open the tutorial.
Setting up OneClick Tracking
Section titled “Setting up OneClick Tracking”-
Log in to your OneClick Ads account.
-
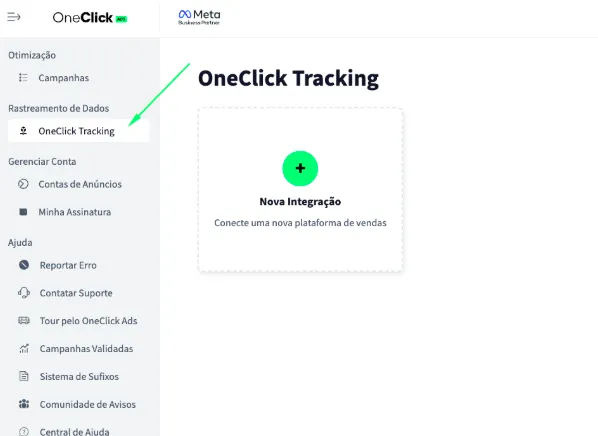
Go to the "OneClick Tracking" tab, available in the left sidebar of OneClick Ads.
-
Click "New Integration".
-
Select the "Lead Generation" product type and click Continue.
-
Select the "Pipedrive" platform and click Continue.
5.1. Enter your API token and click Connect. You can find your token in your Pipedrive account settings under Settings → My Account → Personal Preferences → API → Your Personal API Token.
5.2. Now open the pipeline and the stage at which the conversion will fire. If you set the conversion to happen at “link de pagamento enviado” (payment link sent), as in the example below, OneClick Tracking will record that conversion in your Ads Manager when a lead is moved into that stage.

-
Copy the Webhook URL and add it in Pipedrive by following the steps below: a. Each ad account gets a unique, automatically generated link. b. This link is what connects your account and tracks conversions by UTM. c. In Pipedrive, go to “More >> Automations >> Webhooks” (“Mais >> Automações >> Webhooks”). d. Click ”+ Webhook” in the top-right corner of the screen, then select “webhook” again. e. Configure the Webhook: Event action = change / Event object = deal / Webhook name = OneClick Tracking. f. Paste the webhook URL generated inside OneClick Tracking into the “Endpoint URL” (“URL do ponto de extremidade”) field. Click Save.

-
Copy the UTM Script generated in OneClick Tracking.
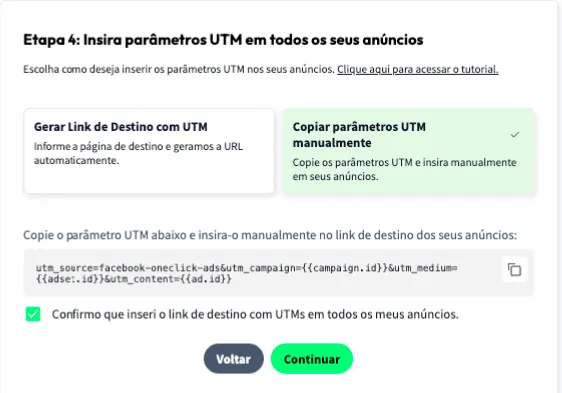
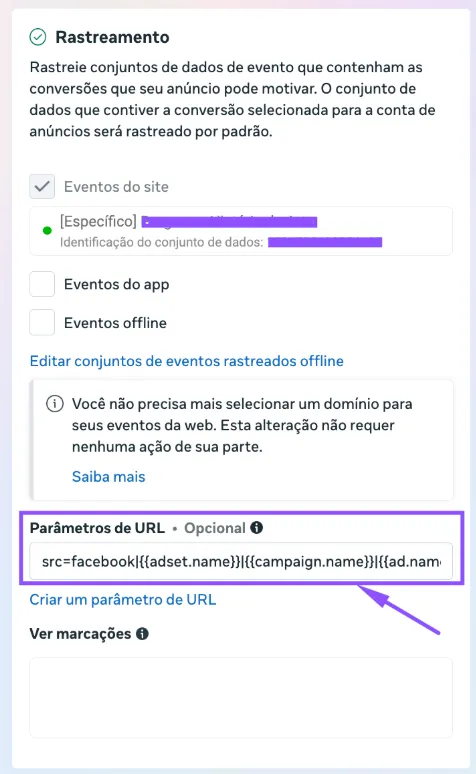
7.1. Paste it into the "URL parameters" field in ALL of your ads in Ads Manager, as shown below:
- Add the UTM Passthrough Script to all your sales pages, so the UTMs are automatically carried into the card of each lead generated. a. You can install it on your website via Google Tag Manager or, preferably, directly in your website's header.
-
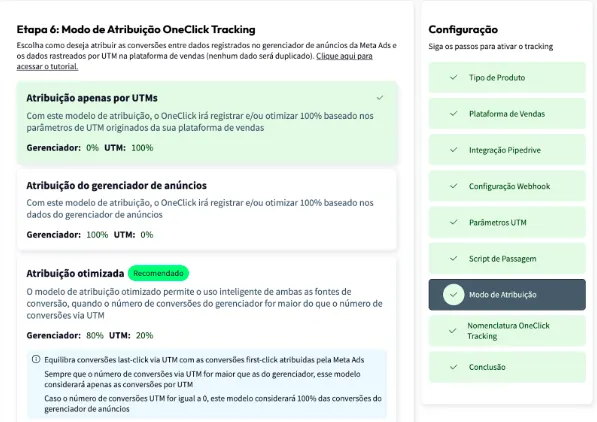
Set the Attribution Mode.
- Watch this video to understand each model.
- Click Continue.
-
Set the Naming Convention that your campaigns, ad sets and ads will receive in your Ads Manager and click next.
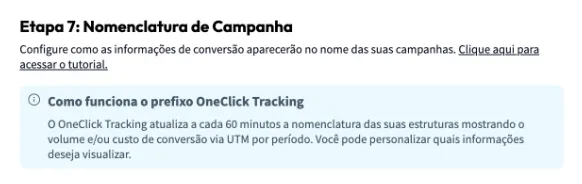
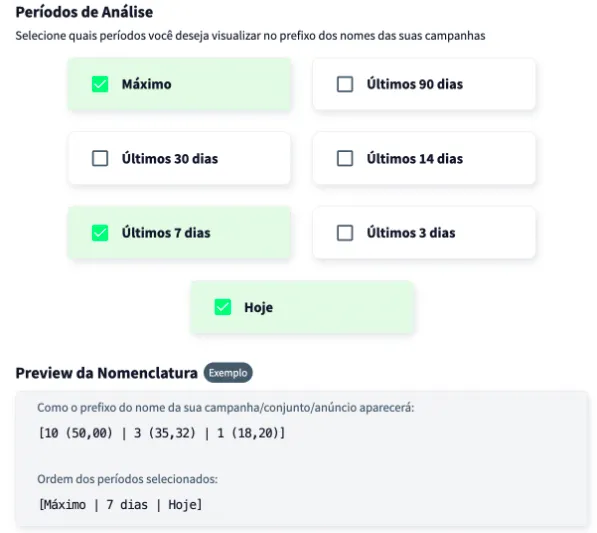
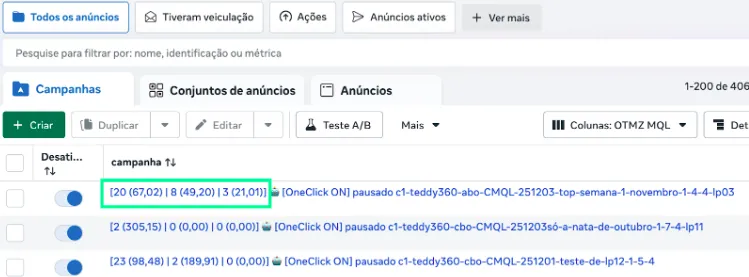
Wait at least 24 hours for the setup to take effect, and all your campaigns (those that receive conversions) will start recording conversions right inside Ads Manager.
Important Notes
Section titled “Important Notes”-
Only campaigns created after the setup will have access to the “Maximum Period” data. This does not affect OneClick Ads optimization on older campaigns in any way.
-
If Pipedrive refuses the saved token (for example, because it was revoked or expired), OneClick Ads notifies you once so you can reconnect the integration. Until you reconnect, you cannot view or change the funnels and conversion stages; conversions from the stages already configured keep arriving normally through the webhook.