
GoHighLevel Integration
Learn how to set up OneClick Tracking.
OneClick Tracking is a new feature for Meta Ads advertisers who use GoHighLevel as their CRM. It provides accurate tracking of qualified leads.
This solution corrects wrong attributions made by Meta, delivering real data based on UTMs and enabling safer scaling decisions.
With OneClick Tracking you see the volume of real conversions per period right in your Ads Manager, making for a quick, clear audit without dashboards that are a hassle to keep up to date.
Note: OneClick Tracking removes the need for extra tracking tools!
Setting up GoHighLevel to generate the Access Token
Section titled “Setting up GoHighLevel to generate the Access Token”Before connecting OneClick Tracking to GoHighLevel, create a Private Integration in the sub-account that receives your leads and generate its token. Follow the steps in the video:
- In GoHighLevel, open the sub-account and go to Settings → Private Integrations.
- Create a new integration and, under Scopes, select all three permissions:
opportunities.readonlypipelines.readonlycontacts.readonly
- Click Generate Token.
Attention: the token is shown only once.
- Copy the generated token
- Keep it somewhere safe
- Use this token in OneClick Tracking
Finding the Location ID
Section titled “Finding the Location ID”Besides the token, OneClick Tracking asks for the sub-account’s Location ID. It is part of the GoHighLevel URL itself: open the sub-account and look at the browser URL. For example, in https://app.gohighlevel.com/location/abc123XYZ/dashboard, the Location ID is abc123XYZ.
Setting up OneClick Tracking
Section titled “Setting up OneClick Tracking”-
Log in to your OneClick Ads account.
-
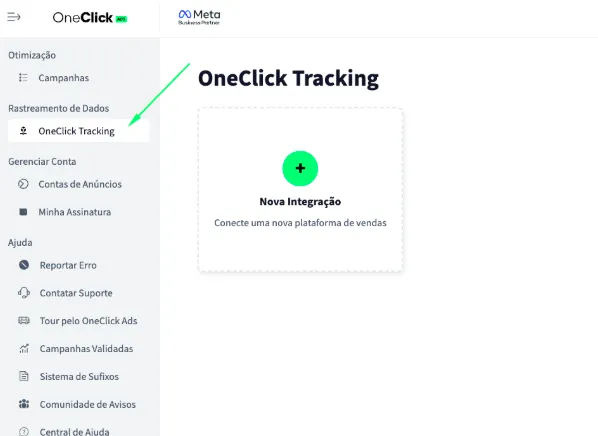
Go to the "OneClick Tracking" tab, available in the left sidebar of OneClick Ads.
-
Click "New Integration".
-
Select the "Lead Generation" product type and click Continue.
-
Select the "GoHighLevel" platform and click Continue.
5.1. In the “Step 2.1: GoHighLevel Integration” step, fill in both fields and click Connect GoHighLevel:
- Location ID: the sub-account identifier, copied from the GoHighLevel URL.
- Access token: the token generated in the Private Integration.

5.2. Once the account is connected, you see “GoHighLevel connected successfully!” and the list of your pipelines. Under “Select the conversion steps”, open the pipeline and check the stage at which the conversion will fire, then click Continue. If you set the conversion to happen at “link de pagamento enviado” (payment link sent), as in the example below, OneClick Tracking will record that conversion in your Ads Manager when a lead is moved into that stage.
-
Copy the Webhook URL and add it in GoHighLevel by following the steps below: a. Each ad account gets a unique, automatically generated link. b. This link is what connects your account and tracks conversions by UTM. c. In GoHighLevel, go to “Settings >> Automation >> Create Workflow” (example in the video). d. Add a trigger with the “Opportunity Stage Changed” event to capture every time an opportunity is moved between stages in a pipeline. This event reports changes in the funnel, such as when a lead moves forward a stage, goes back to a previous stage, or is marked as Won or Lost. If you also want to record the moment a lead enters the pipeline for the first time, you can add another trigger with the “Opportunity Created” event. That way your system receives both the opportunity creation and every move between stages.

e. Add the webhook with the link shown in the tracking setup.


-
Copy the UTM Script generated in OneClick Tracking.
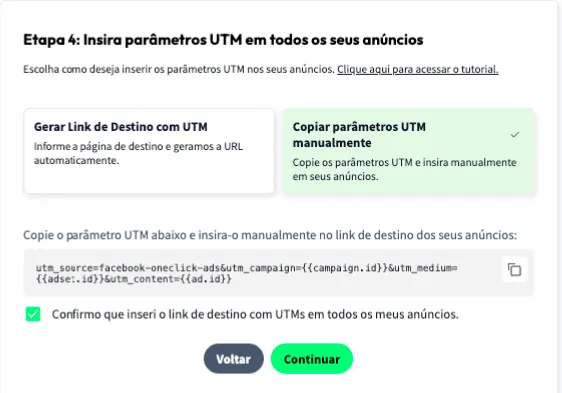
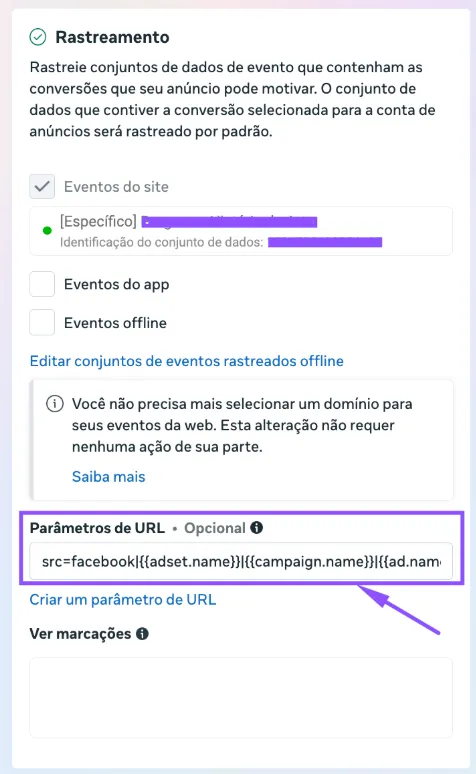
7.1. Paste it into the "URL parameters" field in ALL of your ads in Ads Manager, as shown below:
- Add the UTM Passthrough Script to all your sales pages, so the UTMs are automatically carried into the card of each lead generated. a. You can install it on your website via Google Tag Manager or, preferably, directly in your website's header.
-
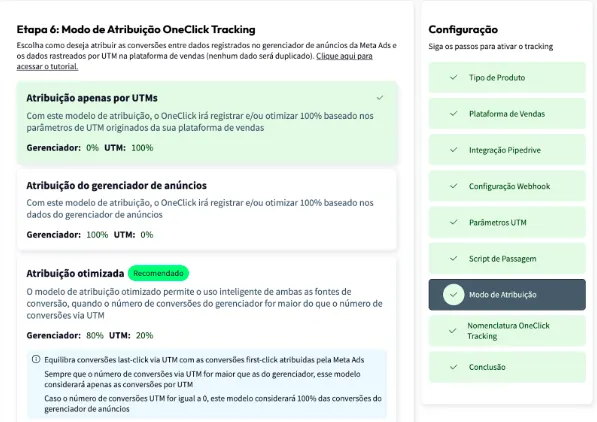
Set the Attribution Mode.
- Watch this video to understand each model.
- Click Continue.
-
Set the Naming Convention that your campaigns, ad sets and ads will receive in your Ads Manager and click next.
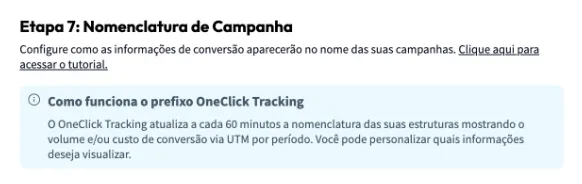
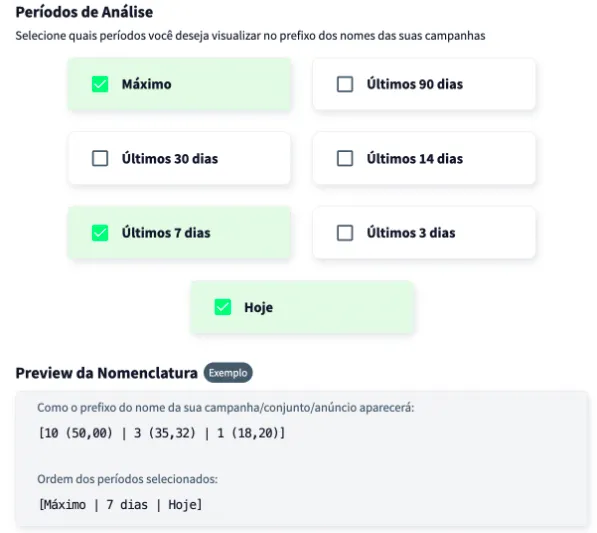
Wait at least 24 hours for the setup to take effect, and all your campaigns (those that receive conversions) will start recording conversions right inside Ads Manager.
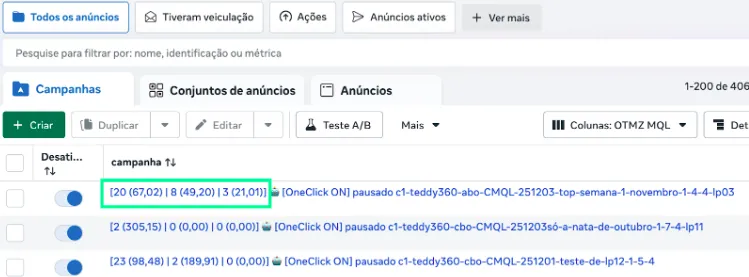
Important Notes
Section titled “Important Notes”- Only campaigns created after the setup will have access to the “Maximum Period” data. This does not affect OneClick Ads optimization on older campaigns in any way.