
Perfect Pay Integration
Learn how to set up OneClick Tracking on Perfect Pay.
OneClick Tracking is a feature for Meta Ads advertisers who use Perfect Pay as the payment gateway for their digital products. It provides immediate and accurate conversion tracking.
This solution corrects wrong attributions made by Meta, delivering real data based on UTMs and enabling safer scaling decisions.
With OneClick Tracking, you see the volume of real conversions per period right in your Ads Manager, making a quick and clear audit easy, without the need for complicated dashboards that have to be kept up to date.
Using the webhook from your Perfect Pay account, OneClick considers UTM data as well as Meta’s data, without duplicating conversions. Each ad account gets a unique link, and you can link multiple products (order bumps, downsells or upsells).
Note: OneClick Tracking eliminates the need for extra tracking tools!
How to Connect OneClick Tracking to Perfect Pay
Section titled “How to Connect OneClick Tracking to Perfect Pay”-
Log in to your OneClick Ads account.
-
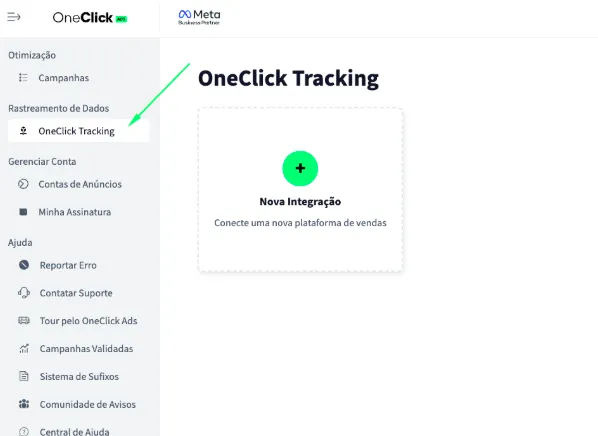
Go to the "OneClick Tracking" tab, available in the left sidebar of OneClick Ads.
-
Click "New Integration".
-
Select the "Digital products" product type and click Continue.
-
Select the "Perfect Pay" platform and click Continue.
-
Copy the Webhook URL and add it in Perfect Pay by following the steps below: a. Each ad account will have a unique, automatically generated link. b. This link is what connects your account to Perfect Pay and tracks conversions by UTM.
6.1. Log in to your Perfect Pay account. In the left sidebar menu, go to Ferramentas > Webhook - Vendas (Tools > Webhook - Sales).
Also see Perfect Pay’s official documentation on Postback/Webhook integration (article 597 or article 72) for more details about the configuration screen.
6.2. Click Adicionar (Add) to register a new webhook. a. Under Produtos (Products), select the product you want to track. We always suggest enabling tracking only for the main product of each funnel. If you want to add other products, repeat the steps, creating a new webhook for each product separately. b. Under URL, paste the tracking URL provided by OneClick. c. Under Eventos (Events), check at least the Aprovado (Approved) event (you can also check all available events — Pendente, Aprovado, Em processo, Em mediação, Rejeitado, Cancelado, Devolvido, Autorizado, Enviado de Volta, Completo, Erro no Checkout, Pré Checkout — OneClick Tracking processes only the approved sale event and automatically ignores all the others, including refunds, chargebacks, abandoned carts and recurring subscription charges). d. The delay field (the wait time between the event happening and the Postback being sent) can stay at its default value — you don’t need to configure a delay for OneClick Tracking to work.
6.3. Under Formato do Postback (Postback Format), select the Perfect Pay format (the platform’s own native format).
6.4. Save the configuration. a. You don’t need to send test events — just finish the configuration in Perfect Pay.
-
Copy the UTM Script generated in OneClick Tracking.
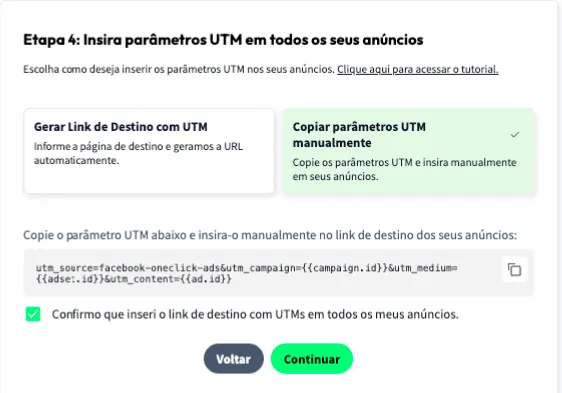
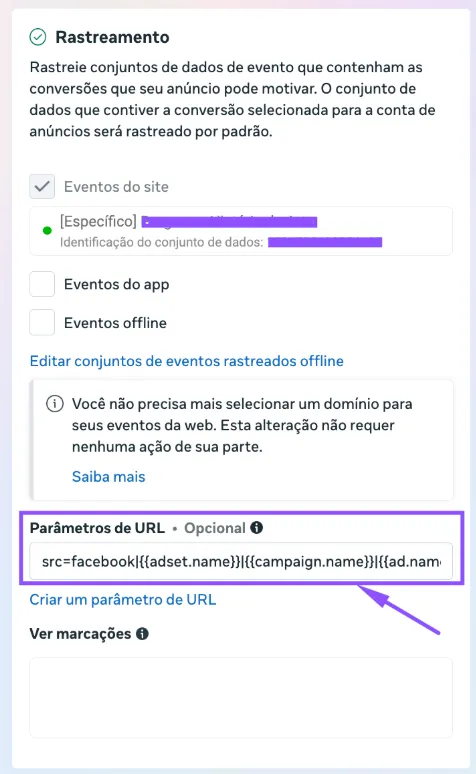
7.1. Paste it into the "URL parameters" field in ALL of your ads in Ads Manager, as shown below:
- Add the UTM Passthrough Script to all your sales pages, so the UTMs are carried through to the final checkout page: a. You can install it on your website via Google Tag Manager or, preferably, directly in your website's header. b. The script must also be present on the Perfect Pay checkout page or on the landing page that comes before checkout.
-
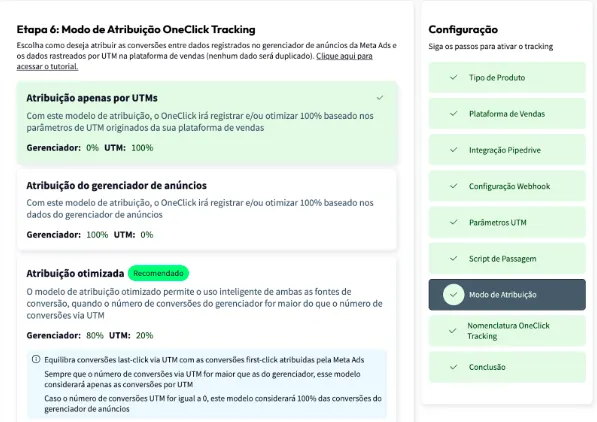
Set the Attribution Mode.
- Watch this video to understand each model.
- Click Continue.
-
Set the Naming Convention that your campaigns, ad sets and ads will receive in your Ads Manager and click next.
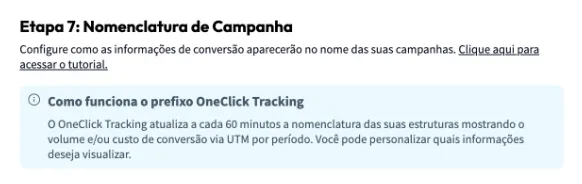
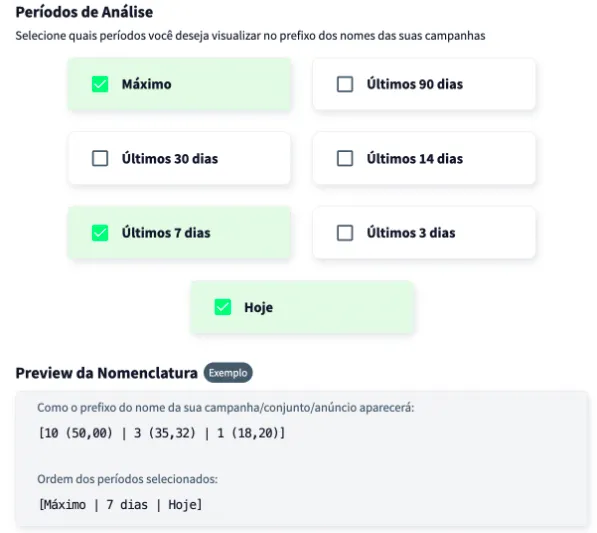
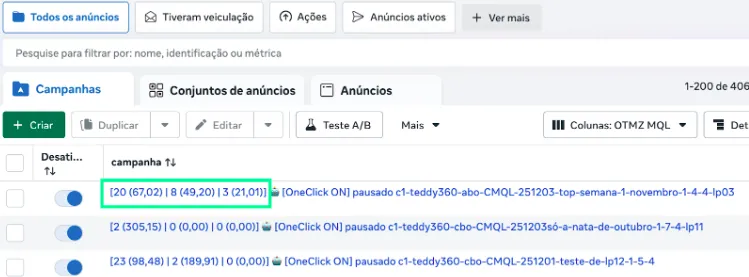
Wait at least 24 hours for the setup to take effect, and all your campaigns (those that receive conversions) will start recording conversions right inside Ads Manager.
Important Notes
Section titled “Important Notes”- Postback format: always select the Perfect Pay (native) format when registering the webhook. Selecting another platform’s format makes the webhook be sent normally, but with fields OneClick Tracking doesn’t recognize — conversions simply don’t show up, with no error warning.
- Install and keep your pixel in the Perfect Pay configuration.
- Suggestion: Avoid sending order bump or upsell data, to keep the optimization of the entry product clean. Either way, if you still prefer, you can also create webhooks for additional products.
- Only the approved sale counts as a conversion: refunds, chargebacks, abandoned carts and recurring charges of a subscription (from the second charge on) are not counted by OneClick Tracking.
- Only campaigns created after the configuration will have access to the “Maximum Period” data. This does not affect OneClick Ads optimization of older campaigns in any way.
- If you want, you can link multiple products by pointing them to the same Webhook link provided by OneClick Ads.