
HeroSpark Integration
Learn how to set up OneClick Tracking on HeroSpark.
OneClick Tracking is a feature for Meta Ads advertisers who use HeroSpark as their platform for digital products, online courses and members areas. It provides immediate and accurate conversion tracking.
This solution corrects wrong attributions made by Meta, delivering real data based on UTMs and enabling safer scaling decisions.
With OneClick Tracking, you see the volume of real conversions per period right in your Ads Manager, making a quick and clear audit easy, without the need for complicated dashboards that have to be kept up to date.
Using the webhook from your HeroSpark account, OneClick considers UTM data as well as Meta’s data, without duplicating conversions.
Note: OneClick Tracking eliminates the need for extra tracking tools!
How to Connect OneClick Tracking to HeroSpark
Section titled “How to Connect OneClick Tracking to HeroSpark”-
Log in to your OneClick Ads account.
-
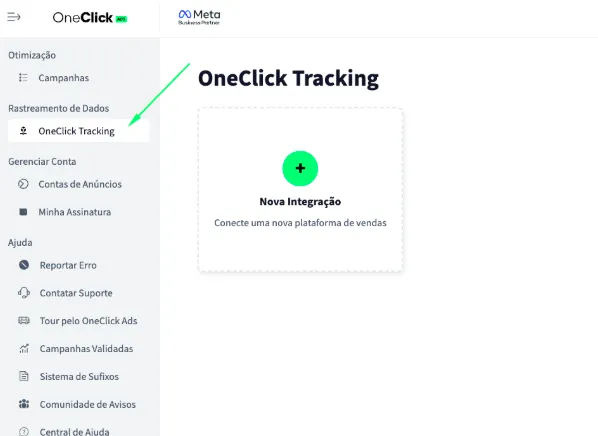
Go to the "OneClick Tracking" tab, available in the left sidebar of OneClick Ads.
-
Click "New Integration".
-
Select the "Digital products" product type and click Continue.
-
Select the "HeroSpark" platform and click Continue.
-
Copy the Webhook URL generated by OneClick and register it in HeroSpark by following the steps below: a. Each ad account will have a unique, automatically generated link. b. This link is what connects your account to HeroSpark and tracks conversions by UTM.
6.1. Log in to your HeroSpark account and go to Automações → Webhook (Automations → Webhook).
6.2. Create a new webhook automation with POST Method and the header
Content-Type: application/json.6.3. Paste the tracking URL provided by OneClick into the webhook URL field.
6.4. Select the Compra Aprovada (Purchase Approved,
PURCHASE_APPROVED) event as the trigger. OneClick Tracking processes only approved/paid orders — other events (boleto/Pix generated, declined, refunded, chargeback, subscription cancellation, etc.) are automatically ignored.6.5. Save the automation. a. You don’t need to send test events — just finish the configuration in HeroSpark.
-
Copy the UTM Script generated in OneClick Tracking.
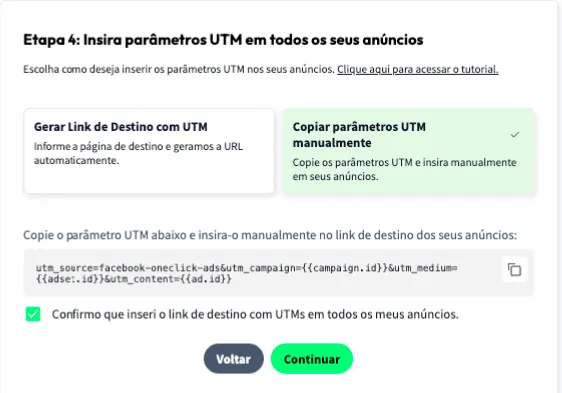
7.1. Paste it into the "URL parameters" field in ALL of your ads in Ads Manager, as shown below:
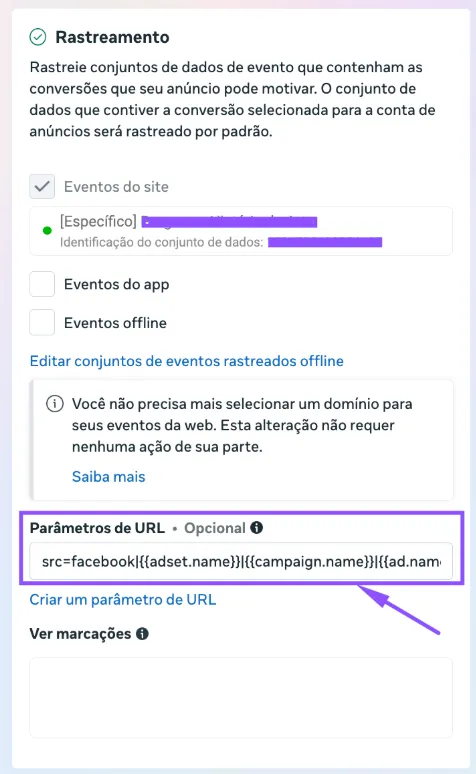
- Add the UTM Passthrough Script to all your sales pages, so the UTMs are carried through to the final checkout page: a. You can install it on your website via Google Tag Manager or, preferably, directly in your website's header. b. The script must also be present on the HeroSpark checkout page or on the landing page that comes before checkout.
-
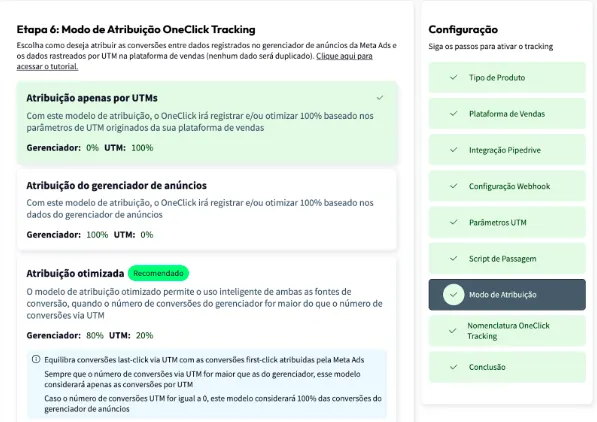
Set the Attribution Mode.
- Watch this video to understand each model.
- Click Continue.
-
Set the Naming Convention that your campaigns, ad sets and ads will receive in your Ads Manager and click next.
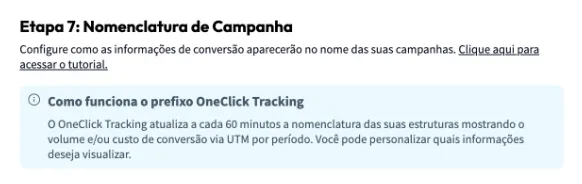
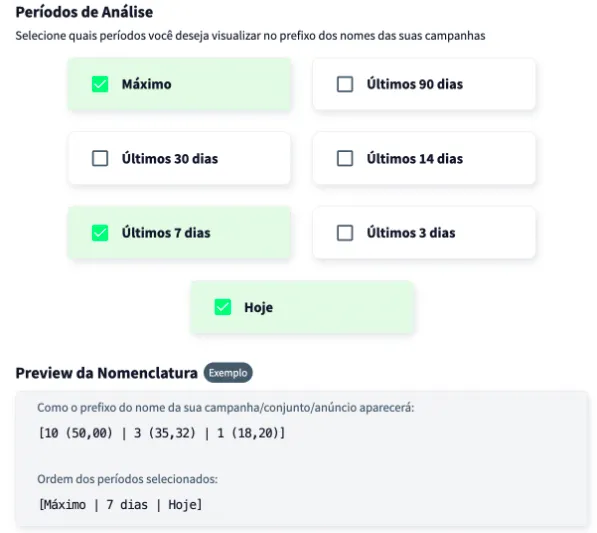
Wait at least 24 hours for the setup to take effect, and all your campaigns (those that receive conversions) will start recording conversions right inside Ads Manager.
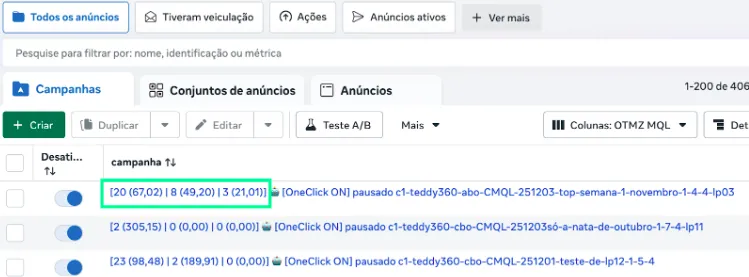
Important Notes
Section titled “Important Notes”- Install and keep the Meta pixel in your HeroSpark account configuration.
- The UTM passing script must be present on the HeroSpark checkout page or on the landing page that comes before checkout to make sure UTM parameters are captured correctly.
- Only campaigns created after the configuration will have access to the “Maximum Period” data. This does not affect OneClick Ads optimization of older campaigns in any way.
- Keep at least one ad identifier (
ad.id) in the UTM parameters — this is what lets OneClick Tracking associate the conversion with the correct campaign, ad set and ad.